|
Muzzle Blasts Online |
|
...for the muzzleloading enthusiast |
|
The muzzleblasts.com domain, subdomains, content, etc., are neither affiliated with the NMLRA nor its paper magazine Muzzle Blasts |
|
Muzzle Blasts Online |

|
|
|
|
|
|
Build Your Own Portable Shooting Bench
Everyone who shoots benchrest matches needs a bench to shoot from. Some ranges have "loaner" benches available, but they may not be "user friendly" to everyone who sits at them. To shoot winning scores, you need a bench that fits you and your gun(s). The other qualities that you want in a shooting bench are steadiness and the ability to be easily transported to and from the range. Because your needs in a bench may differ from mine, I would not be so presumptuous as to say this is the only style or size of bench that will work. However, this is the bench I use, and if you choose to copy it, or modify it to your own needs and likes, that is fine.
We want the bench to be heavy enough that its own weight adds to its steadiness, but not so heavy that you need to enlist the help of four men and a pony to move it from your vehicle onto the firing line. Therefore, the top should be made from a hardwood slab such as maple, oak, walnut, or ash. There must not be any "spring" to the top, so 11/4" to 11/2" is a good choice for thickness. The use of hardwood not only adds to the weight and strength of the bench top, it will also afford you the opportunity to put a nice finish on the wood portion of your bench. A good furniture finish will add to the appearance of your bench and protect the wood.
The length of the top of your bench will be decided mostly by the length of your gun(s). Having too short a bench, where you and the rifle butt are dangling off the back end, will not increase your scores. A rifle with a 40" to 42" barrel will fit nicely on a 60" to 65" bench top. Even if you have a shorter rifle than that, plan ahead, someday you may buy or build a longer rifle. So don't "short sheet" yourself when deciding on the length of your bench top. The legs also need to be strong and "non-springing". Four lengths of 1" inside diameter steel pipe threaded on one end will work well. For the average size male or female shooter, ranging in height from 5'2" to 6', the height of the top of your bench should be around the 30" mark. That's about the height of your kitchen table. Sit beside it and see if you need a lower or higher bench.
|
|
Figure 2 |
|
|
Figure 3 |
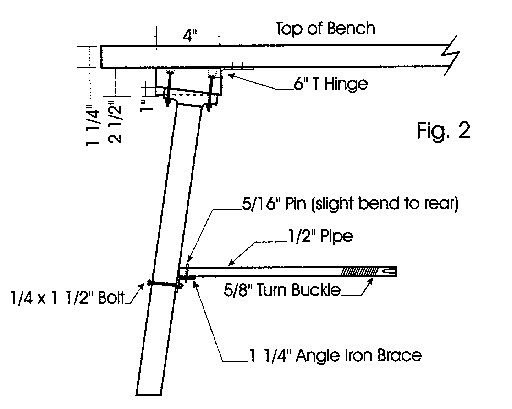
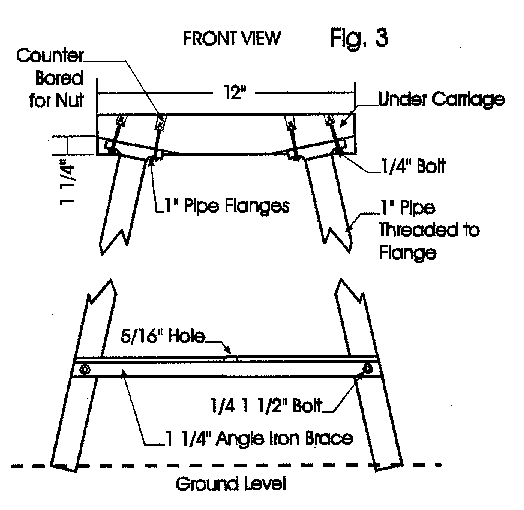
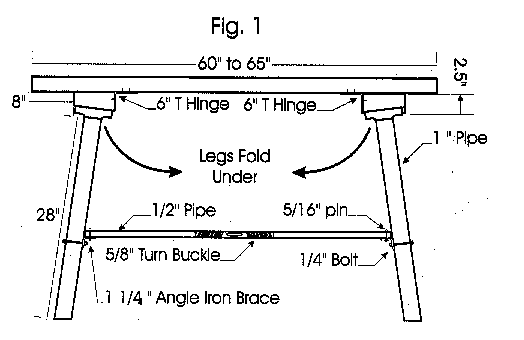
Four heavy duty 6" T hinges are required to attach the undercarriage and legs to the top of the bench. Screw the head or cross arm of the T hinge to the undercarriage and the strap of the T to the under side of the bench's top. Place the hinge so that the front and rear sets of legs fold toward each other. Having the legs fold under the bench makes it more compact for travel or storage, and as you can see in figure 2, the legs have 11/4" angle iron braces on them. By attaching a strap or cord to the under side of the bench where the leg braces over lap each other, they can be fastened to the underside of the top in the folded position, thus preventing the legs from opening during handling.
|
|
Figure 1 |
To this point we have a bench top with 4 strong legs firmly attached and braced to it, but we have nothing to rest the muzzle of the rifle on. It makes no sense to build a good strong, steady bench and then have a muzzle rest that is not the equal of the bench. How many times have you seen a shooter stack sand bags to rest a rifle on only to have them shift, or topple over. This method also lacks the finesse of a screw adjustment for small increases or decreases of height for the muzzle rest.
|
|
Figure 4 |
|
|
Figure 5 |
|
|
Figure 6 |
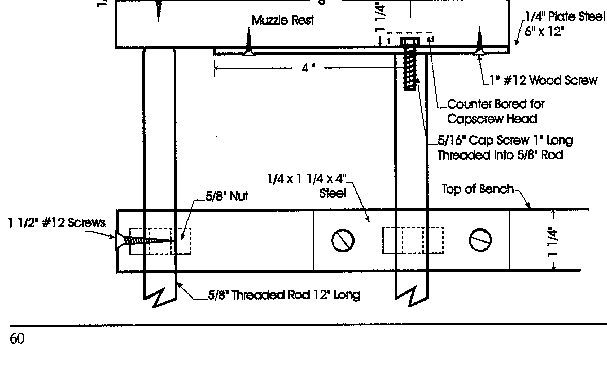
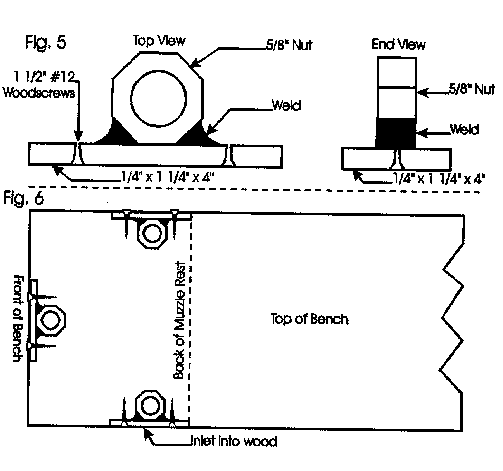
With the elevating rods attached to the underside of the steel plate by means of the two 5/16" cap screws, attach the wooden part of the muzzle rest to the plate so the elevating rods are 2" from the back side of the muzzle rest, reference figure 4. Thread the 5/8" elevating rods into the nuts attached to the side of the bench top. At this point, you will find the muzzle rest appears to be rather floppy, but with the third 5/8" rod threaded up through the nut which is mounted on the front edge of the bench, the front of the muzzle rest is properly braced. This forms a three point support for the muzzle rest, and the front elevating rod also acts as a lock once the two side rods are turned to the desired height.
The side rods can be used not only to raise and lower the muzzle rest, but level it as well if your bench is set on uneven ground. On one of my benches I even attached a small spirit level to the muzzle rest so I could easily see when I had it level. By drilling a 1/4" hole in the bottom end across the 5/8" rods, a small "L" shaped piece of 1/4" rod can be placed in the hole to form a handle that will allow you to "crank" the rod up or down. For best results, turn the side rods up or down together, so each side is raised evenly.
The next addition to the bench is a stop bar across the front of the muzzle rest, again reference figure 4. This will allow the cant bar of your rifle to butt up against it as you lightly lean into the butt of your rifle. If the stop bar were not there, you would push your rifle forward until the cant bar slid over the front edge of the muzzle rest. Make it low enough so that your barrel doesn't rest on it. If that occurs, you will see the cant bar is not resting on the muzzle rest's platform and a side to side rocking motion is occurring. The rifle must rest on the cant bar in a level position. There is another option that may be used instead of the stop bar and that is a centering pin. This is simply a pin of steel made from a large wood screw turned into the top of the muzzle rest. It is generally placed about 1" back from the front and centered in the width of the muzzle rest. The cant bar of the rifle has a small groove in it to fit the pin. After the screw is turned into the wood, the pin is cut to the height that will match and fit the groove in the front of the cant bar on the rifle. This assures that the rifle is always put in the same position for firing by centering it on the pin. This also stops forward motion just as the stop bar did. If you have several rifles of various designs, you may want a pin and a stop bar on your muzzle rest.
If you are the type of shooter who prefers to load back at the loading benches rather than at the shooting bench, then you are pretty well done building your shooting bench at this point. Stain the wood and protect it with your choice of finish, paint the metal parts, and voila! You have a shooting bench!
|
|
Figure 7 |
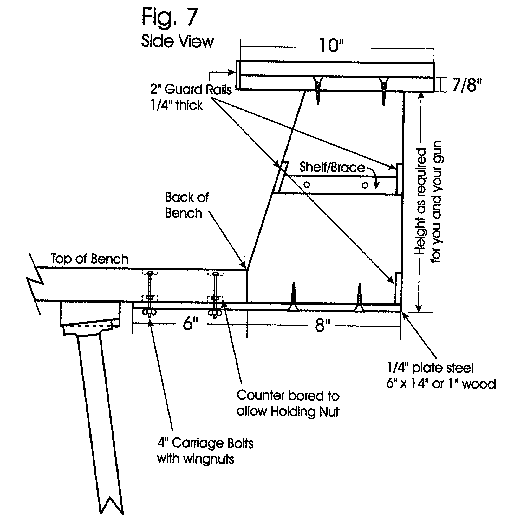
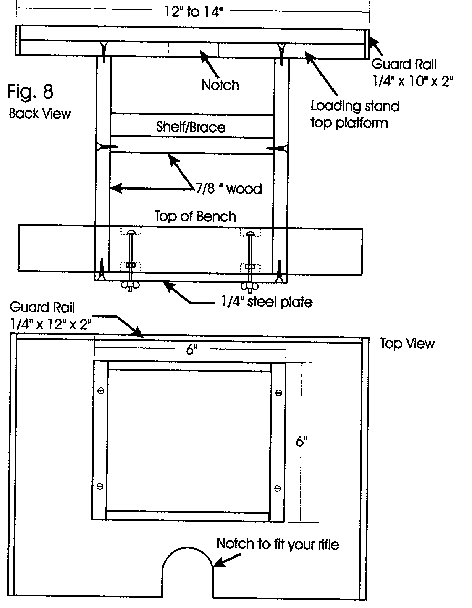
The use of wingnuts, as shown in figure 7, will allow you to "drop" the loading stand quickly and easily for transportation or storage. The stand used in figure 7 was made from the same wood as the bench top and muzzle rest, so when it was finished it all matched. The lower shelf actually forms a "pocket" behind the back of the bench top and I like to keep my supply of caps in there, as well as my cap remover. The center shelf acts as a brace to strengthen the loading stand but is also handy for small items such as the top off your powder can etc. On the top shelf, or platform, there is a notch to lean your rifle into so it will not fall over. The 10" X 12" surface is large enough for my starter, patch knife, small hammer, a can of balls, a container of cleaning patches, powder measure, and a can with strips of teflon patching. You can lay out the needs of your own loading procedures as you like on your loading stand. The guard rail around the edge of the top is really a necessity to prevent your equipment from being bumped off the top of the loading stand. With or without the optional loading stand you now have a strong, steady, portable shooting bench that looks like a piece of fine furniture and easily folds up for travel. The last thing you need to go with your new shooting bench is a good solid seat to sit on. Your scores will not improve, even if your bench and rifle are rock solid, if you are wiggling all over because your butt is perched on an unstable seat that is not the right height for you and your new shooting bench.