|
Muzzle Blasts Online |
|
...for the muzzleloading enthusiast |
|
The muzzleblasts.com domain, subdomains, content, etc., are neither affiliated with the NMLRA nor its paper magazine Muzzle Blasts |
|
Muzzle Blasts Online |

|
|
|
|
|
|
Flints, Frizzens and Touch Hole Liners
Flintlock Problems and Solutions
There have been volumes written on flints and flintlocks, about the proper way to place the flint in the hammer jaws, to sharpen the flint, both mechanically and manually, and (this one I REALLY like) the SPEED of various brands of flintlocks. This is not to dispute any of these studies or opinions, but to give other methods and theories.
|
|
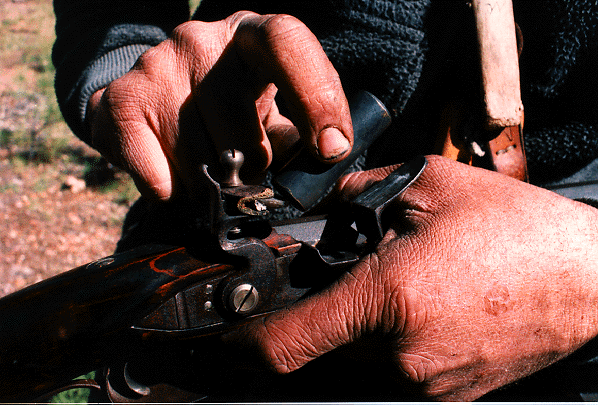
Flint edge being knapped with brass knapper |
Which is best? Is it knapped flints, cut flints, agate flints, black English flints, or space-age manufactured flints? This will always be an argument. I have used them all, and they all work well. It is a matter of personal preference. I still prefer black English flints.
Lock speed is irrelevant as far as I am concerned. Granted, a quality lock versus a junk lock is no contest. How fast the hammer falls doesn't determine how fast the rifle fires. There are many things that affect the ignition of a flintlock. The condition of the frizzen, placement of the touch hole liner, the internal shape of the touch hole liner, and sharpness of flint all together determine how fast a flintlock will fire. A rifle with the fastest lock that throws only one or two sparks into the priming powder will NOT fire as fast as a rifle with a micro- second-slower lock that throws fifty sparks to ignite the priming in fifty places. Actually, how fast the hammer falls is virtually imperceptible to the average shooter. How fast the rifle fires AFTER the hammer falls IS perceptible to the shooter.
Flints and Knapping a New Edge
A sharp flint is absolutely paramount for good performance from your flintlock. The fastest lock time cannot compensate for a dull flint. Once, during a match, I observed a fellow shooter struggling to get his flintlock to fire. He finally resorted to knapping the edge of his flint. I watched as precious time was evaporating from his match relay clock. He was using the little hammer and rod method that we all have seen many times. I offered to show him an easier and faster method, but he was convinced his method was the only way to properly knap the flint edge. He ran out of time before he finished shooting. This method works, but it is extremely slow.
|
|
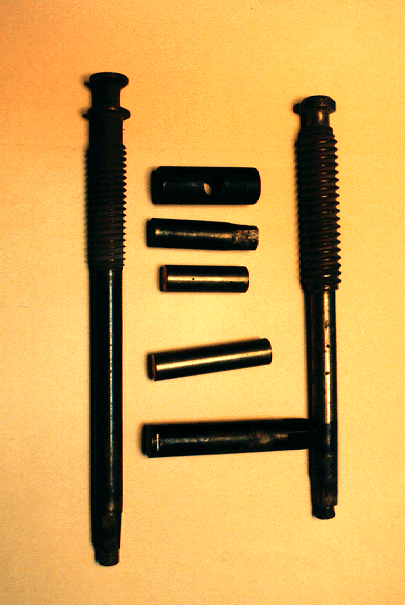
Scrap brass valve stems and brass knappers |
To use the tool, the hammer of the lock is placed at half cock with the frizzen open and the pan empty of priming powder. The piece of brass is held at a slight angle to the face of the flint. Hit the cutting edge of the flint with a sharp rap from the piece of brass. The bottom of the flint face will flake off, leaving a sharp new cutting edge. Two or three sharp raps may be necessary for a clean, sharp edge. You will have a sharp flint in a few seconds - faster than you can find your little hammer and rod.
A word of caution: NEVER, NEVER test the sparking of a new or sharpened flint on a loaded gun, even if there is no prime in the pan. More than once I have seen rifles go off when a spark hits the touch hole.
Use only brass or bronze, in order to prevent sparks. Aluminum is too light to be effective, and steel could produce sparks. The brass doesn't have to be 3/4" in diameter, and it doesn't have to be round. Any diameter from 5/8" to 1" square, round, or rectangular will work fine. Some sources for brass stock are scrap metal dealers, tool supply companies, knifemaking suppliers, and plumbers. I have several old brass valve stems that were salvaged from a plumber's junk box. Brass is cheap and available almost everywhere. I keep a few of these little brass pieces with me and have made many new friends by giving them one and showing them how to use it. The piece of brass fits very nicely in your possibles bag or shooting box and can be found quickly.
Some people have never learned how to knap the edge of a flint and just throw away the dull flint and replace it. Years ago when flints were twenty cents each this may have been O.K., but today the cost of a good English flint is a dollar or more. Learn to knap the edge on your dull flints and get your dollar's worth.
Conditioning the Frizzen.
The condition of the frizzen is very important to how many sparks are produced with a sharp flint. If the frizzen looks like a "washboard", breaks up the edge of your flint, or doesn't throw many sparks, it is time to clean up the face of the frizzen and reharden it. The procedure that I use is very easy. I have heat treated over a hundred frizzens with this method. The items you need are: One wire clothes hanger; "Kasenit" surface hardening compound; Two quarts cheap 30-weight motor oil; one quart cheap automatic transmission fluid; and two propane torches (one will not generate enough heat).
|
|
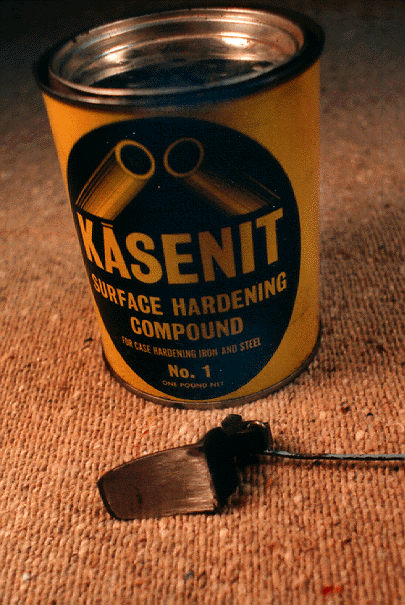
Flinlock frizzen ground and ready to be heat treated |
Next, cut a section of wire from the clothes hanger, about eight to ten inches long. Run the wire through the screw hole in the frizzen and wrap the wire tightly so the frizzen doesn't flop around. Pour about a cup of "Kasenit" into a shallow metal can. A tuna can works well. Clamp one of the torches in a vise and light both torches. Heat the frizzen until it is bright red throughout. It must be entirely heated to a uniform color. Smother the heated frizzen in the "Kasenit" until it is well coated. The "Kasenit" will melt and adhere to the metal. Immediately reheat again to a bright red color and cook it for about three minutes. Be sure the entire frizzen is a uniform bright red color and completely coated. After cooking, quickly quench the heated frizzen in the oil mixture and swirl it around to assure fast cooling. Leave the frizzen in the oil until it is cool enough to handle. Wipe the excess oil from the frizzen and repeat the procedure for a second time. I do the above procedure twice to assure a good deep hardening.
After the frizzen is cooled enough to handle, clean it with acetone, alcohol, or any degreasing agent. Remove it from the wire and polish the face of the frizzen with 400 grit paper or emery cloth. Be careful, and don't drop the frizzen on a hard surface because it is brittle like glass and can break at this point. Affix the frizzen back onto the wire and light one torch. With a low flame starting at the pivot point and pan lid, slowly and carefully heat the frizzen. This is called drawing the temper back. Be sure that the color changes uniformly. It will happen very fast. When it reaches a soft yellow/brown (STRAW) color, quickly quench it in the oil and swirl around to assure uniform cooling. Leave in the oil until completely cool. The ideal colors are between straw and bronze. If you don't hit the straw color, but maybe blue, don't despair. Try it for sparking; it will probably work well anyway.
Remove the frizzen from the oil and clean with a degreasing agent. Put a drop of oil in the screw hole and install the frizzen and frizzen spring back onto the lock. Test it using a new sharp flint. It may take several attempts before you start getting uniform sparking. After you start getting sparks, check to see if there are any tiny metal shavings in the pan. If there are, you have done it right.
Touch Hole Liners
Usually the attitude is, "If there is a hole through the barrel to the main powder charge the rifle will fire just fine." This is true, but the results may not be what you desire. A proper touch hole (vent) liner is critical to the speed that a flintlock will fire. I like permanent touch hole liners in my rifles. My experience has been that the liners with screwdriver slots or the hex head screws tend to collect fouling and slow down the ignition. I like the type that requires using a nipple wrench for installation and filing off the excess lug so it's flush with the barrel flat. Why remove the liner anyway? The more times you screw a liner or nipple in and out of your rifle or pistol, the looser it becomes. This common practice stresses and wears the threads and increases the possibility of cross threading. That will lead to failure. All of the "blow outs" of liners and nipples that I have witnessed are the result of shooters frequently removing and reinstalling these items. To replace a permanent liner, just drill out the hole in the liner and remove it with an Easy-Out.
|
|
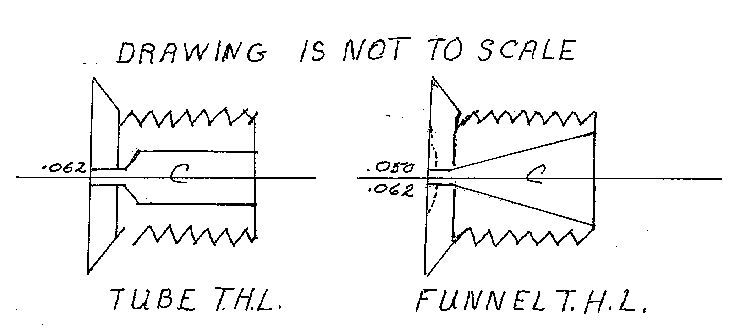
Touch hole liner modification |
The hole in a percussion nipple runs between .020 and .030 in diameter, depending upon the manufacturer. This size hole is not practical for good ignition in a flintlock. For best results I use a liner with a .062 (1/16th.) hole for my flintlocks in .40 caliber or larger. For .32, .36, and .38 calibers, I like to use a .050 hole in the liner. With the smaller powder charges that are normally used in these small calibers, the .062 hole allows too much jetting of main powder charge out of the touch hole. This causes erratic pressures and affects the accuracy. The lag time between the jetting and ignition of the main charge makes it more difficult to hold through on the target in the offhand position, especially with a flintlock pistol. The smaller hole reduces the pressure loss from the main charge in a smaller caliber. I replace the touch hole liner when the hole gets about .008 larger than the original hole size, or when the accuracy falls off. A good, properly shaped liner should last for about 800 to 1000 shots, and that is a lot of shooting.
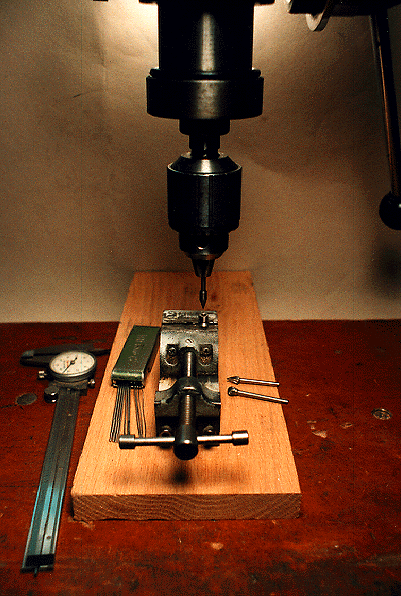
The best hole gauge and vent pick that I have found is a set of welding torch tip cleaning wires. These can be bought at any welding supply shop. To check the size of the hole, insert the largest wire that will fit into the hole, and then measure the wire with a dial caliper or micrometer. If the hole is too large, then replace the liner.
|
|
Touch hole liner set up to modify. Torch tip, cleaning wires, and caliper |
In later American and European guns, before alloys and stainless steel, touch holes and nipples were lined with gold or platinum. Even though these metals are soft, they have a very high melting point and are very erosion resistant. No one makes gold or platinum lined nipples or vent liners anymore. These are an unnecessary luxury today.
Another good idea is to wrap the threads of all parts that screw into the barrel, such as breech plug, drums, nipples, and vent liners, with Teflon™ pipe thread tape. This is the best thing that I have found to keep the threads from seizing. If you use it you won't have any more trouble with tight sticking nipples or parts. I have pulled breech plugs and touch hole liners from barrels after two or three years of shooting with no effort at all. I keep a roll of the Teflon™ tape in my shooting box. Teflon™ pipe thread tape is available almost everywhere.
If you are not satisfied with your flintlock's performance, try to determine what the problem is and do something about it. It will be a lot less frustrating for you.